
In this article I will offer some tips for stamping of seed plates.
First, what about not stamping the plates at all? For example you will see people talking about using an engraving tool to write the letters onto the plates. I cannot imagine that this would really serve your goals well. The reason we are writing on titanium (see blog article) is that we are trying to survive some calamity, like the house burned down, or we dig up the plate and we realize the ground was wet in that area for the past couple of years. My point here is I cannot imagine that some shallow mere engraving activity would lead to markings that would be clear and unambiguous after some calamity.
And you will see people who suggest, start with a plate that has some dark finish on the surface of the plate, and maybe the engraver exposes the shiny metal under the dark finish. My worry is that if you sift the plate out of the ashes of the burned-down house, or excavate it out from the soggy ground, there may no longer be any clear distinction between dark and light areas.
I think nothing short of really serious stamping, that goes deeply into the metal, would be reliable in the face of potential harms that we are trying to beat.
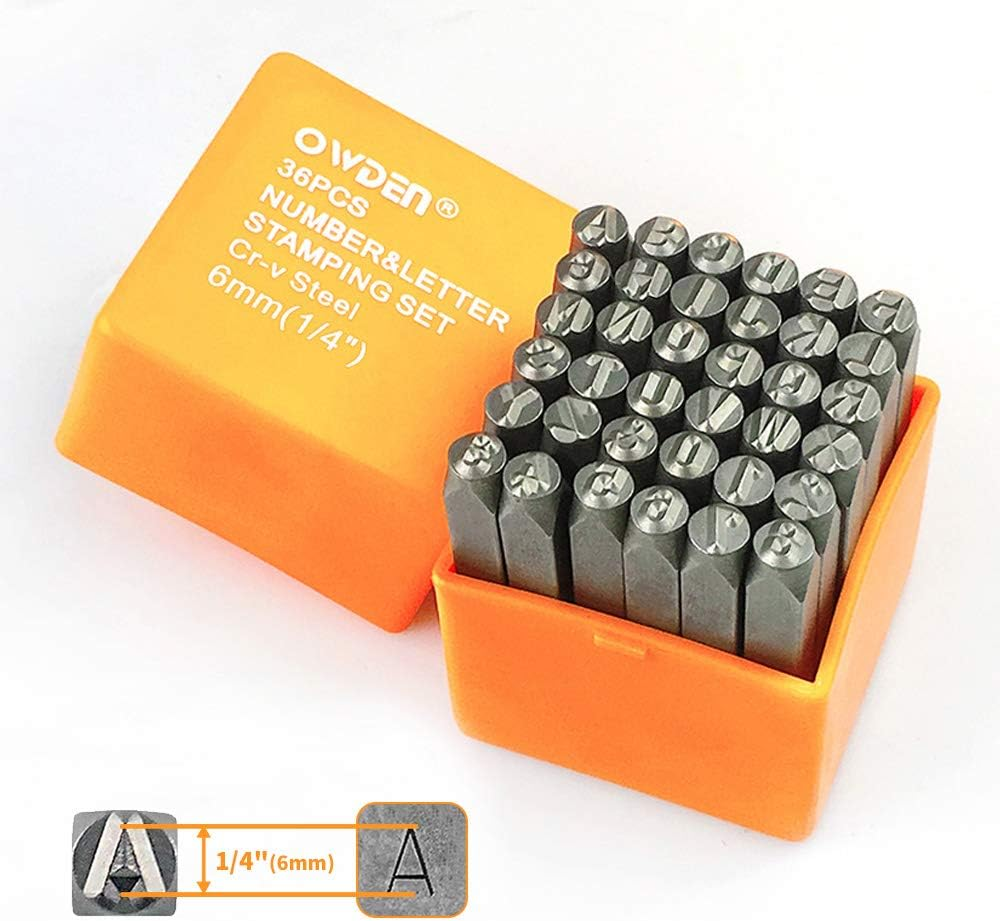
The next thing is to pick some stamps. I started with some ¼-inch stamps as shown at right. After a while I realized I had made a mistake and 3/16-inch stamps are the way to go. This is for two reasons. First, there is only so much surface area on the typical credit-card-sized seed plate and it is no easy trick fitting four ¼-inch letters into each of the 24 numbered places on the plate. But second, and more importantly, ¼-inch stamp tries to deform a lot of metal. By comparison the 3/16-inch stamp only tries to deform about 57% as much metal. This means you have a better chance of getting deeper into the face of the plate with a formed letter that will be readable.
So now back to some tips for stamping of seed plates.

First, keep in mind that titanium is likely the very hardest metal you could encounter in daily life and upon which you might try to do letter stamping. As discussed here, the tensile strength of titanium is nearly three times higher than aluminum, and almost twice as high as the stainless steel that is the second-best choice for a seed plate. You are going to need a big, really big hammer. Not a tack hammer, not an ordinary hammer. It needs to be a sledge hammer. It probably needs to be three pounds (well over one kilogram).
This tells you, by the way, that if you get to work stamping some seed plates, and if you say “hey, this stamping was not as hard to do as I feared it would be!” then this means you probably got ripped off. You ordered titanium seed plates and what they did was cheat by shipping you stainless steel or worse, aluminum. You probably would have noticed right away if they faked it with aluminum, because the aluminum is so much lighter than the other metals, and you can bend the plate with your fingers. But if they faked it with stainless steel, you might not have noticed right away. Use a strong magnet and see if it sticks to the plate. The magnet would stick strongly to carbon steel but will stick at least gently to stainless steel. If so, then the vendor ripped you off.
So now hopefully we are really sure the plates really are titanium. What next?
What’s next is that you will get nowhere with this if you just put the plate on a table or workbench and smack it with a stamp. The table or workbench will silently absorb the entire impact of the strike with the sledge hammer, and the stamp will bounce harmlessly off the surface of the plate. You could then look at the plate and you might not even be able to make out which letter it was that you were trying to stamp into the plate.
So there is no choice, you need to be on a massive anvil of some kind.
The next tip is, pick an anvil that is big enough that you can put both plates on it side by side. Suppose the first letter to stamp is, say, “B”. Keep in mind that you will be stamping that letter on each of the two plates. So the first trick is, lay out both plates on the anvil, side by side. The idea is that you are stamping each letter twice, once on the first plate and then on the second plate. If you are going to go on the treasure hunt to find the letter “B” in your kit of stamps, and then having found it, if you are going to rotate it until it is right side up, and then put it on a plate, and smack it … then you might as well get a second payoff from all of this stamp-wrangling by then moving a couple of inches to the right to stamp that same letter “B” into the other plate.
Which will only work if both plates are on the anvil at once.
The next tip is, tape down the plates. They will skitter around if they are not taped down. I used electrical tape but you could probably use almost any kind of tape.
The next tip is, don’t do any stamping on the business face of the plate until you have gotten a lot of practice doing some test stamping on the other face of the plate. Do some test stamps to get an idea how hard you have to smack the stamp. And to get a feel for how badly you will fail if you don’t make the stamp absolutely perfectly vertical above the plate. If it is angled even a tiny bit, you will get only part of that letter “B” smacked into the plate.
You need to maybe rock the the stamp to the left and right and up and down a fraction of a degree until you are pretty sure the lettered face of the stamp is really nice and flat against the face of the plate. (Which might not mean the body of the stamp is absolutely straight up and down!) And then whack the stamp using most of your upper body weight, bringing the sledge hammer down really hard onto the head of the stamp.
Some people will hold the stamp with a vice-grip plier, so that if the sledge hammer misses, it will only harm the plier and not strike the user’s hand.
Having done a dozen or more test stamps, you will hopefully get to the point of being more confident about lining up the stamp and smacking it really hard with the sledge hammer. At this point you can flip over the plate and start stamping the business face of the plate.
Except you will have placed two plates side by side, as mentioned above.
The next thing to realize is, you only need the first four letters of each seed word.
Plan ahead a bit. Do not stamp words 1 to 12 and then return to the top row to do word 13. Do word 1, and then do word 13. When words 1 and 13 are done, then move down a row and do words 2 and 14.
Before you start a given group of two words, lay out a line of tape that will serve as a guide for the stamping. You lay it out across the lower edge of where you want a line of letters, and let the stamp rest ever so gently against that tape. This will help you line up the letters.
Leave a Reply